Starting in April 2024, it will now be possible to sell cryptocurrency in the Changelly mobile app via our partner MoonPay. Below, you will find a step-by-step guide on how to use this new feature.
Selling crypto in the Changelly app is as easy as buying or swapping it. To begin, tap the middle button at the bottom of the screen and select the Sell option.
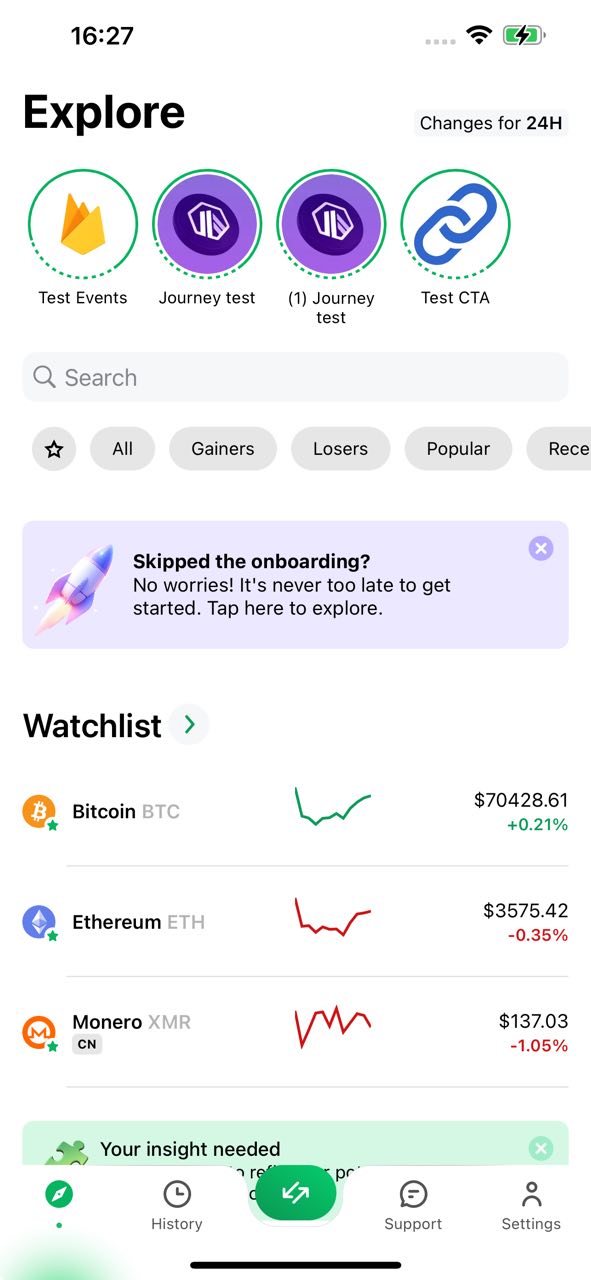
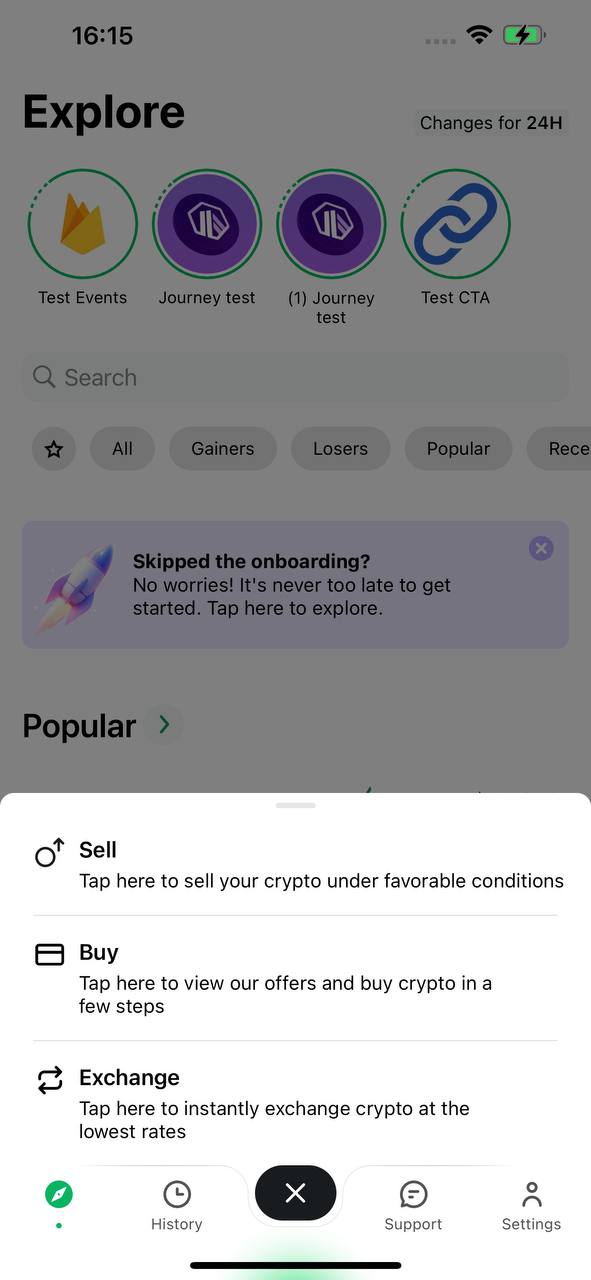
You will be redirected to the MoonPay widget, where you can select the cryptocurrency you want to sell and the fiat currency you want to get and enter the amount. Tap Continue to proceed to checkout.

To sell crypto via MoonPay, you will need to verify your identity. The first step to doing that is entering your email address.

You will receive an email with a verification code. If you can’t find it in your inbox, check your spam folder.
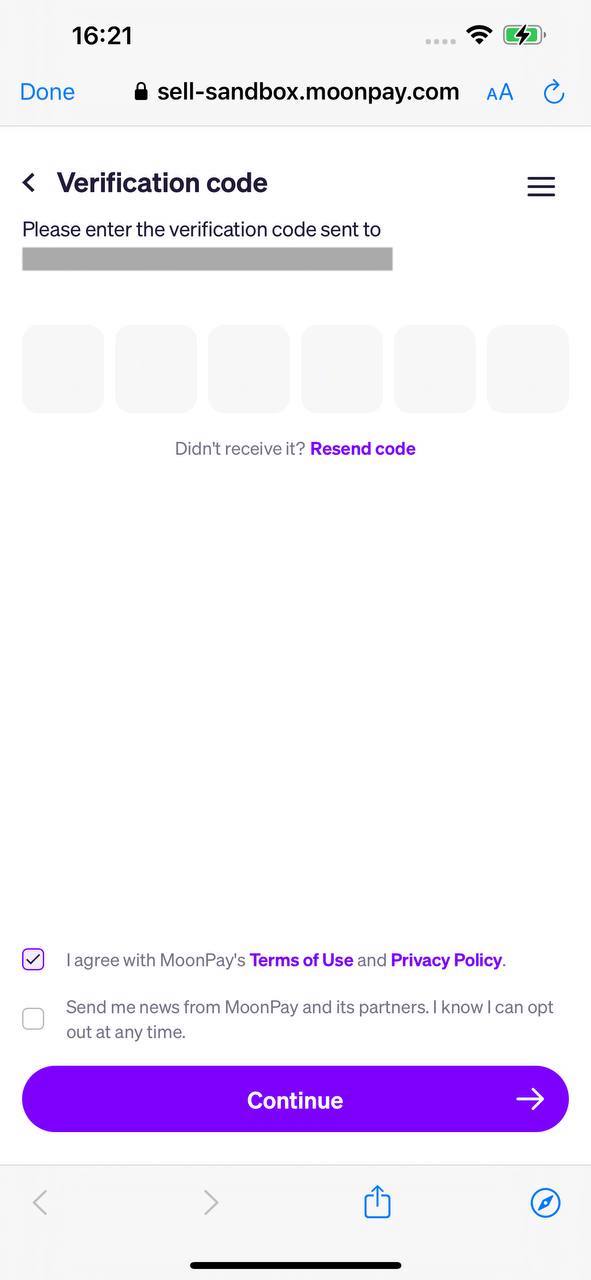
After you enter the code, check the box below to agree to MoonPay’s Terms of Use. Check the second box if you’d like to receive promotional emails and news from MoonPay and their partners.
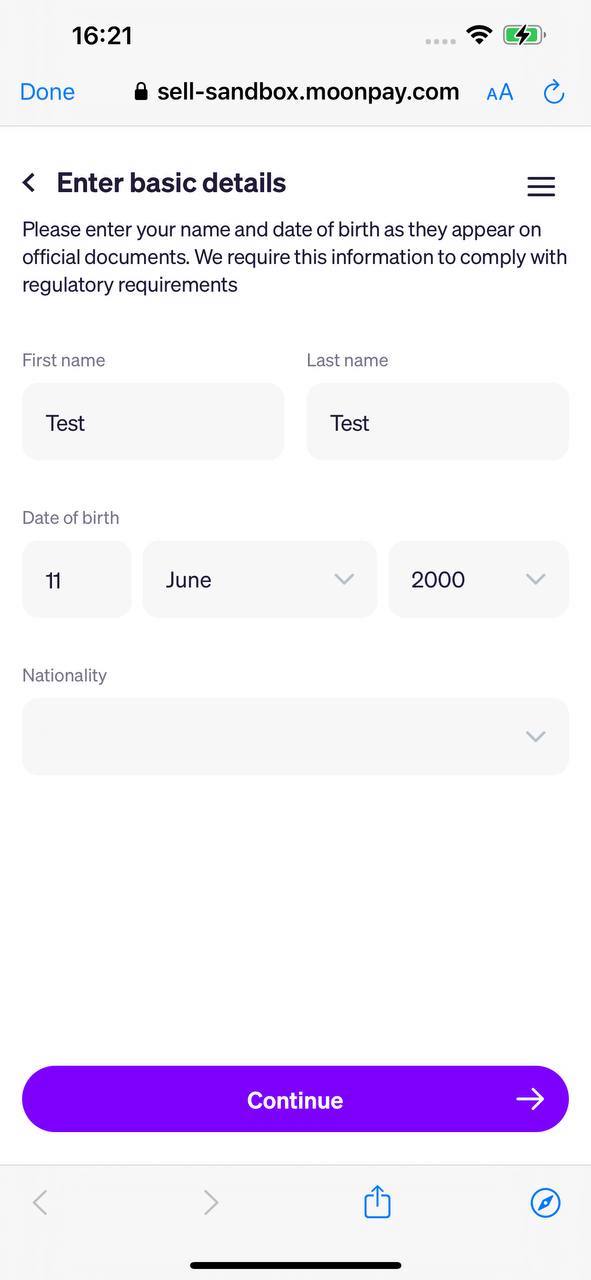
Next, you’ll need to enter your basic personal information. Please enter the correct information into the designated fields — if there are any mistakes, you won’t be able to pass the verification process. Then, tap Continue to proceed.
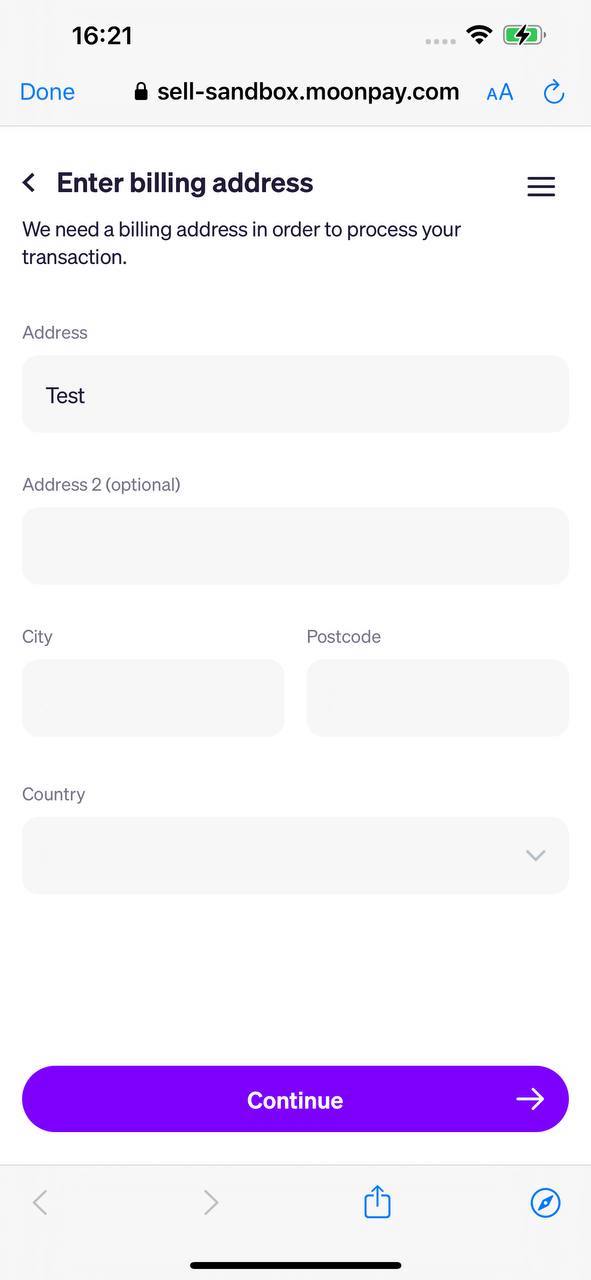
Fill in your billing address, which should match the residential address you provided to your bank. Make sure to double-check all the information you’ve entered. Once you’ve done that, tap the Continue button to go to the next step.
During the identity verification process, you will need to submit an ID document and undergo a liveness check. Before you proceed, you can learn more about KYC and verification procedures in crypto here.
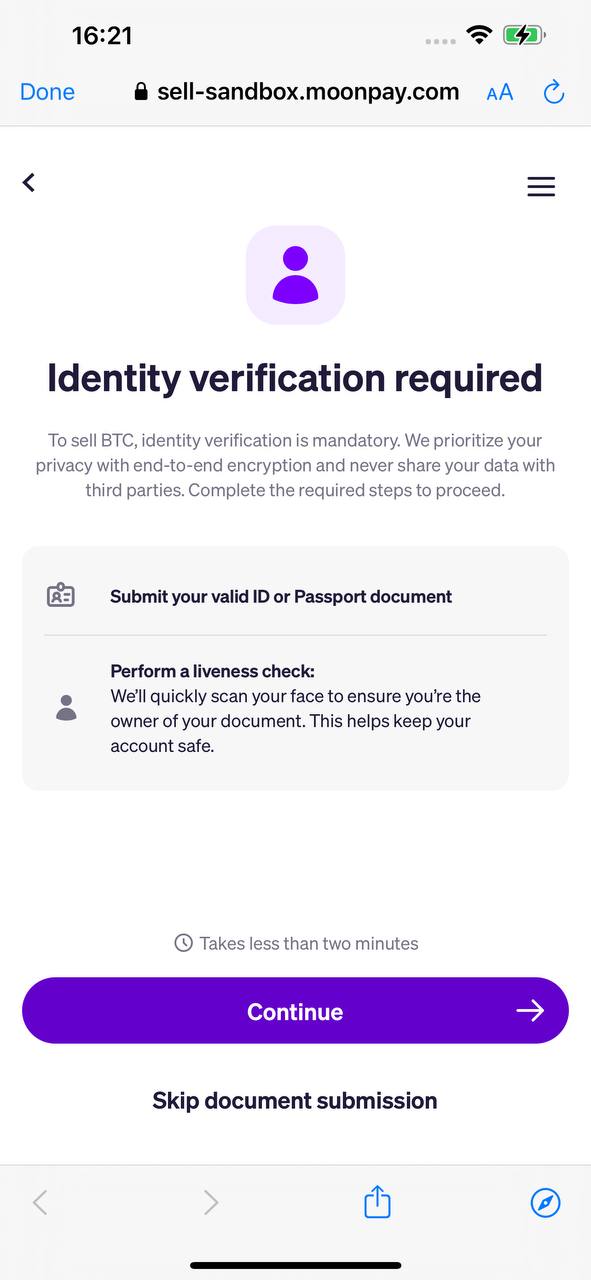
The verification process on MoonPay only takes around 5 to 30 minutes.
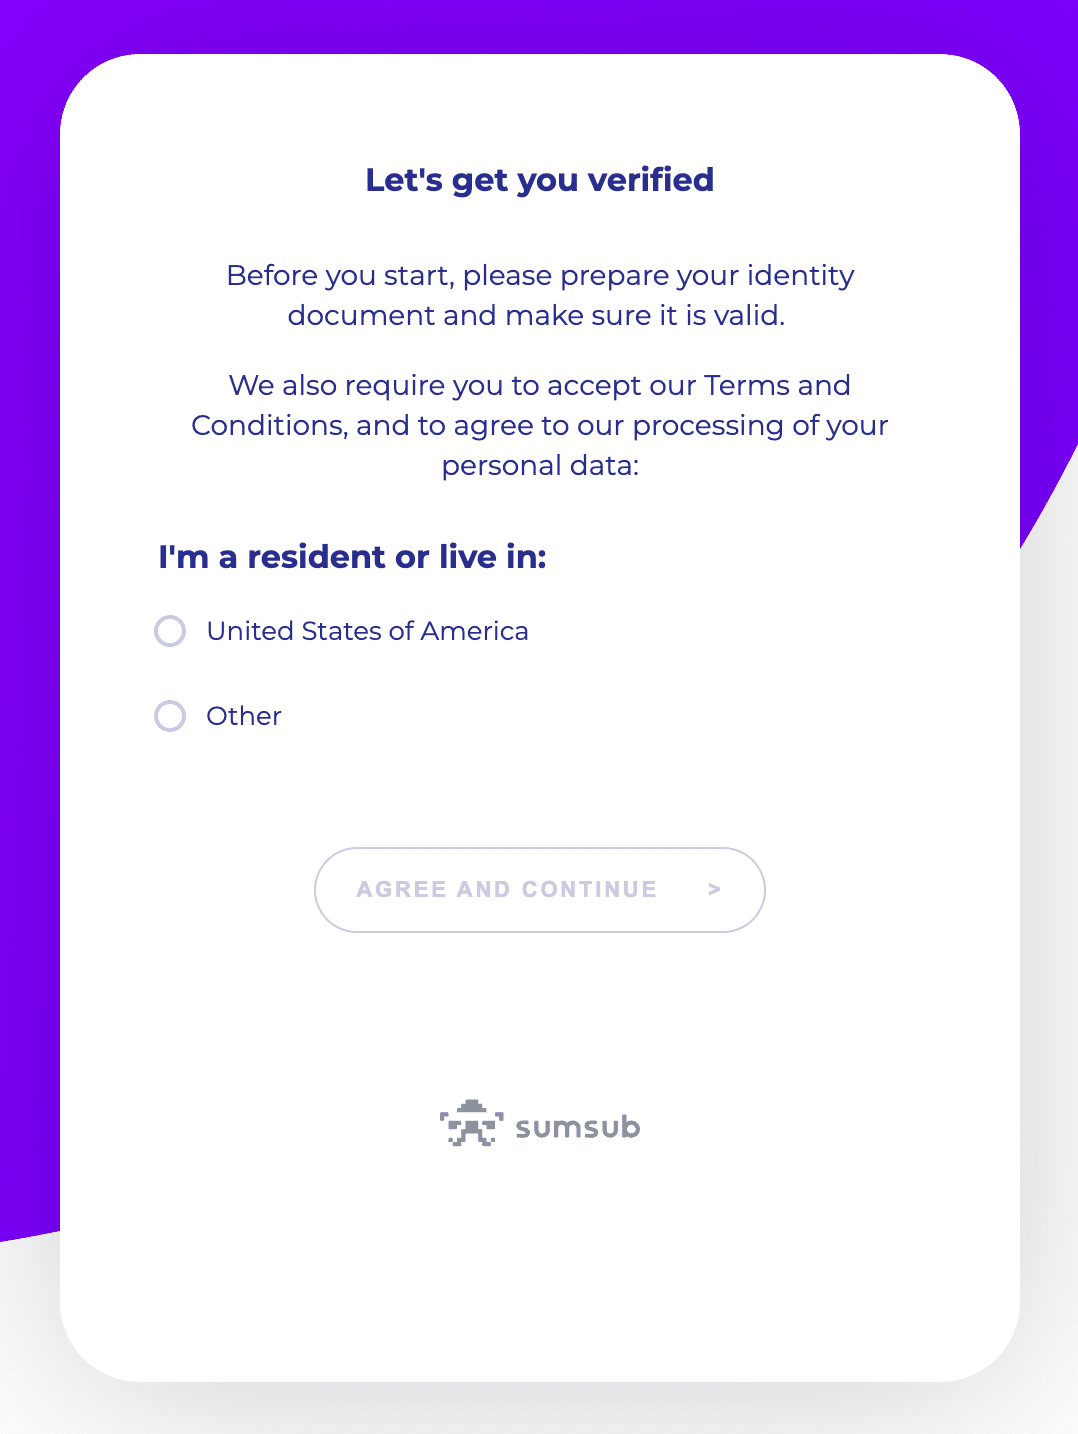
Please select the first option if you’re a resident or domiciled in the United States. Otherwise, choose the second one.
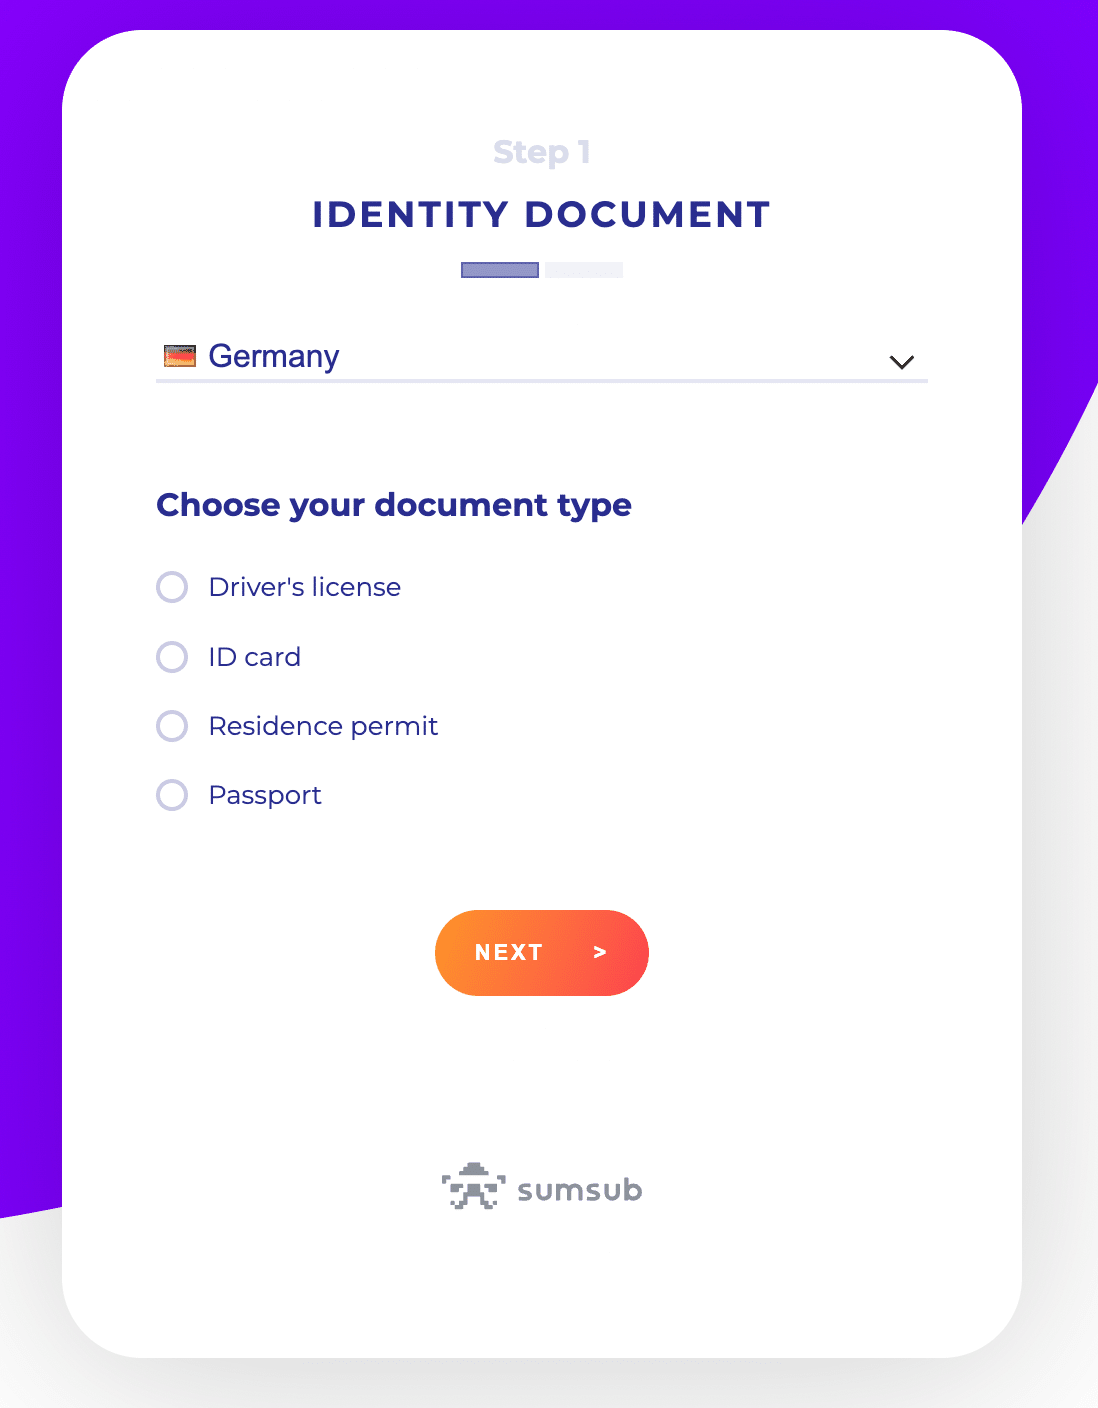
Now, you will need to get your ID ready. First up, choose the country your ID was issued in from the drop-down menu. Next, select the type of ID you would like to use.
Please keep in mind that the list of accepted documents differs by country. You can learn more about MoonPay’s verification process and the types of accepted IDs on this page on the MoonPay website.
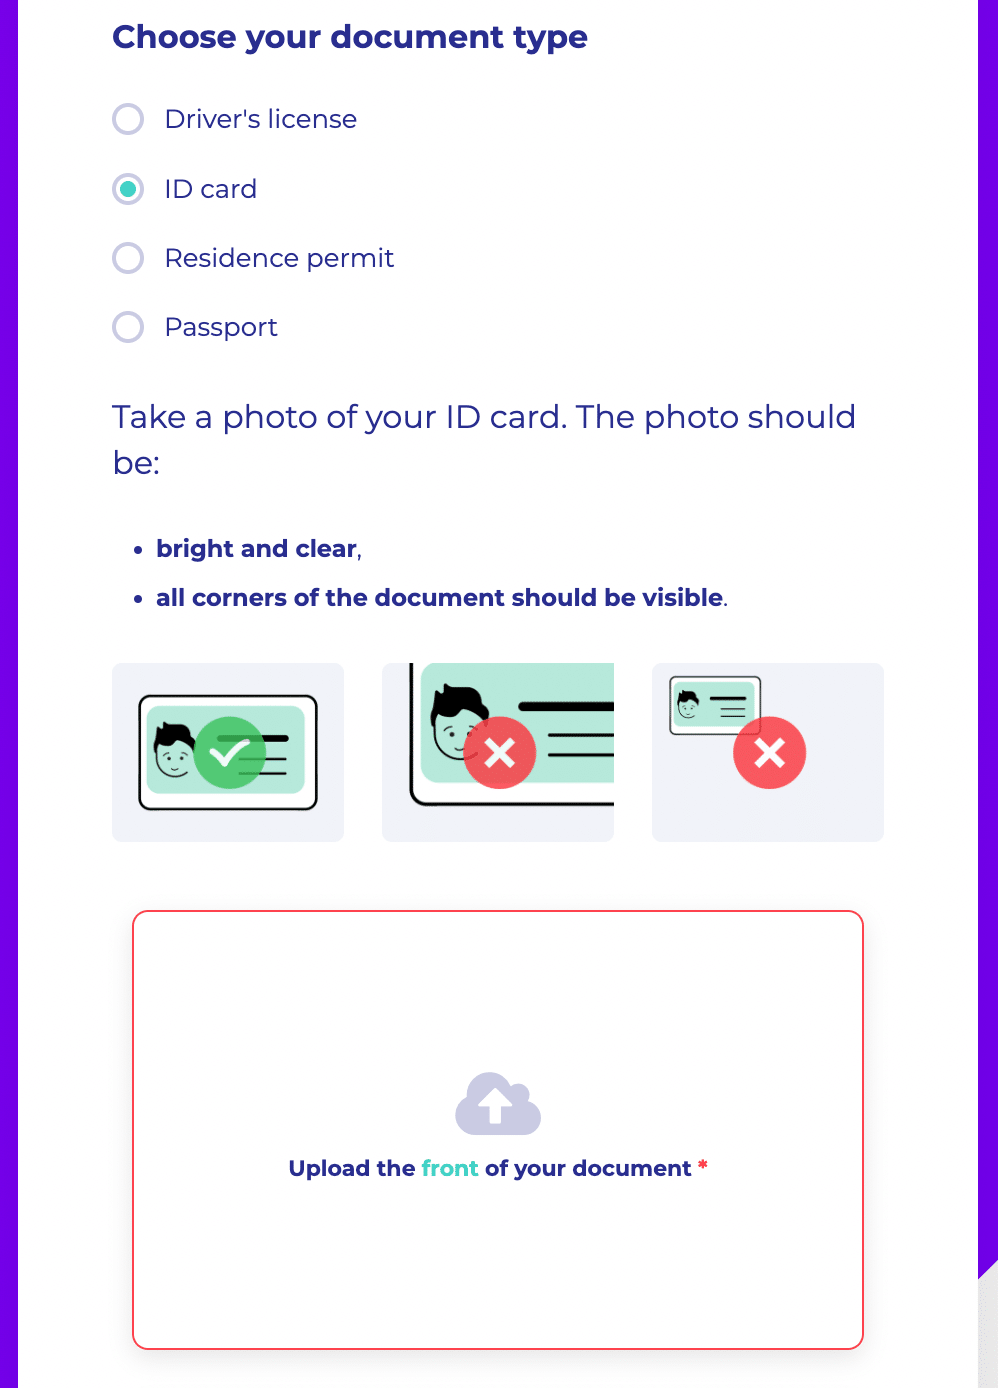
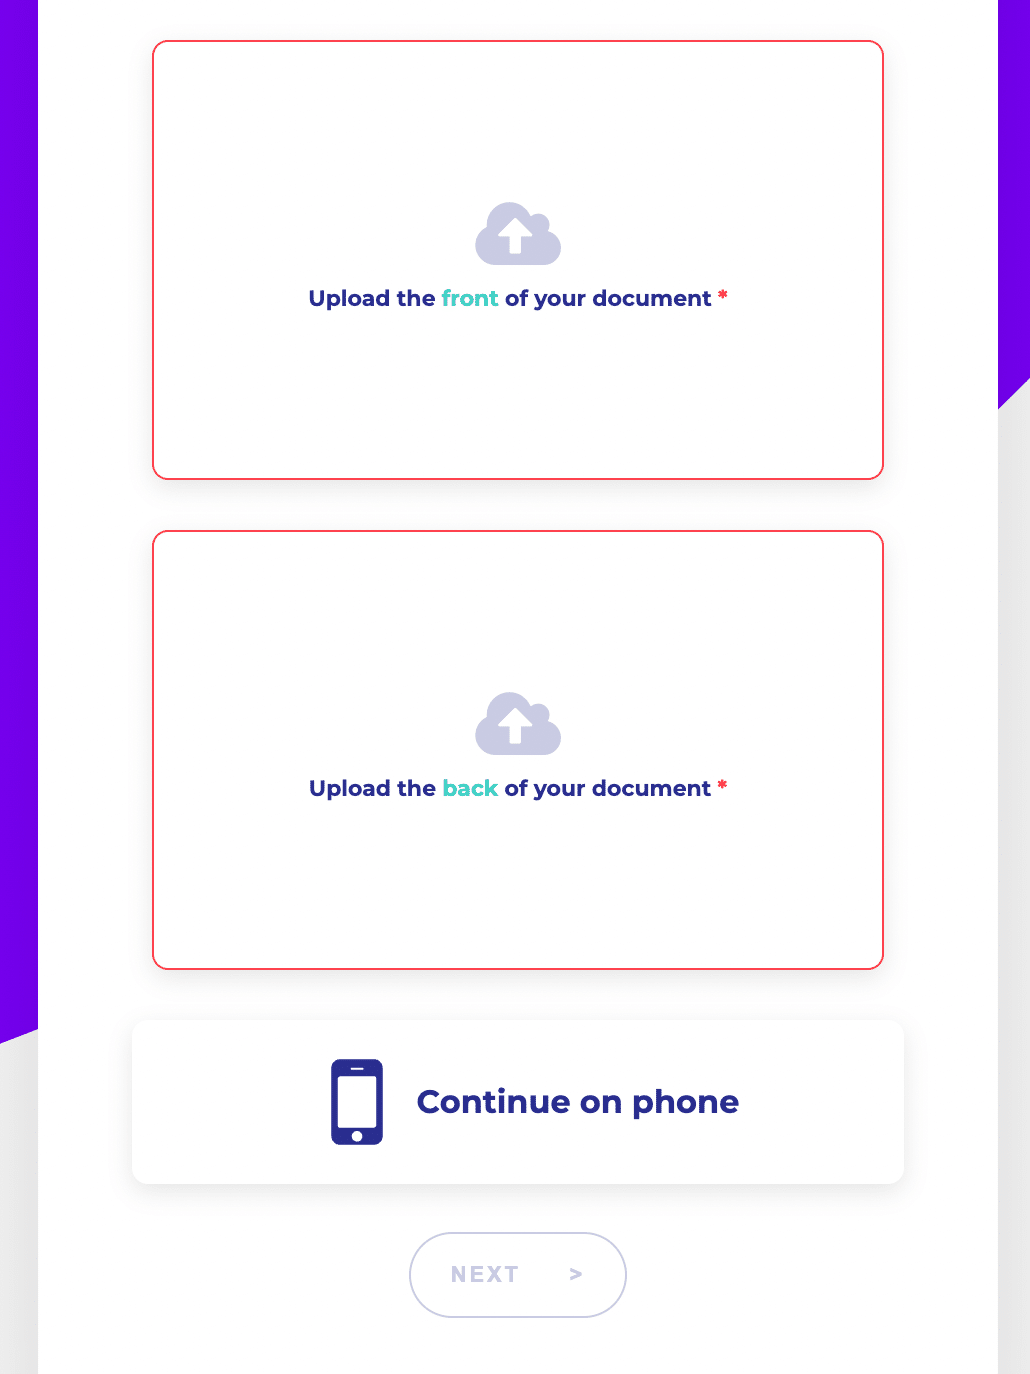
At this stage, MoonPay requires that you take a photo of the front and back side of your ID. Please keep in mind that the photos you take should follow these guidelines:
Before proceeding, make sure you’ve uploaded the photos into their designated slots: the photo of the front side of your ID goes first, and the photo of the back goes second.
Now, the time has come for a liveness check, which will serve as biometric verification and confirm your status as a real person. In order to complete it, you should give the browser you’re using camera access. Follow the onscreen instructions to complete the liveness check.
Next, you will need to provide your withdrawal method details. Your withdrawal options will depend on your country of residence.
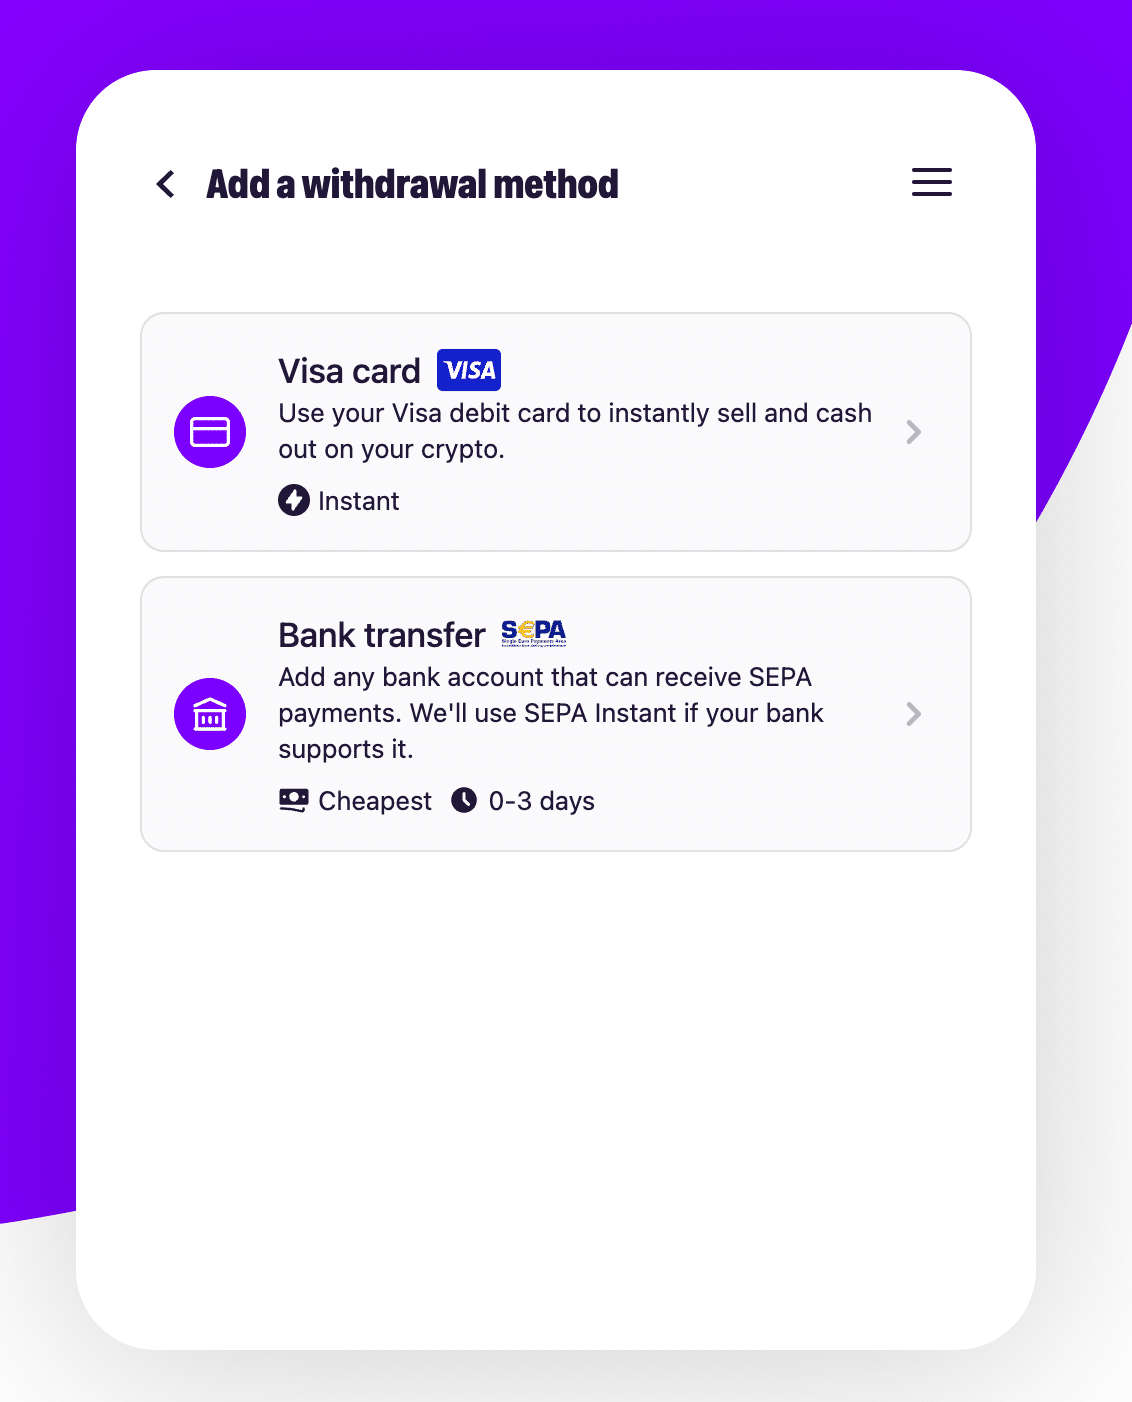
Select your preferred withdrawal method from the options available. You will be automatically redirected to the next stage, where you’ll need to enter the specific details of the method you chose. In this example, we are using the bank card option. Ensure your information is correct, and double-check everything. Your saved billing address will be displayed below. If there are any mistakes or you want to enter a different address, tap the Update button.
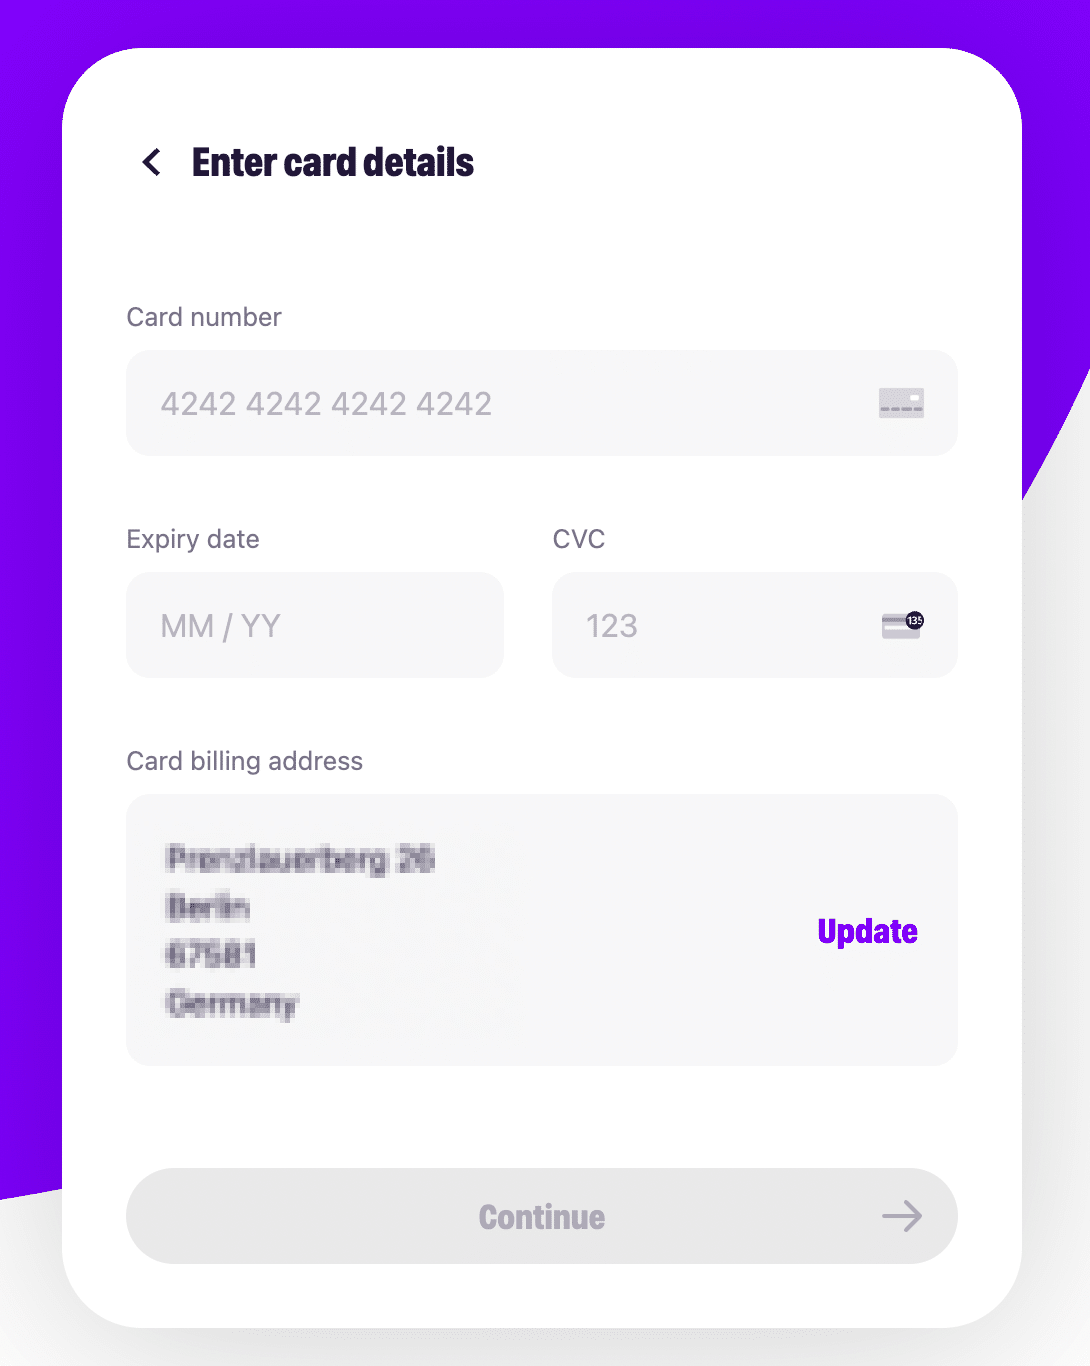
If all the information is correct, tap Continue.
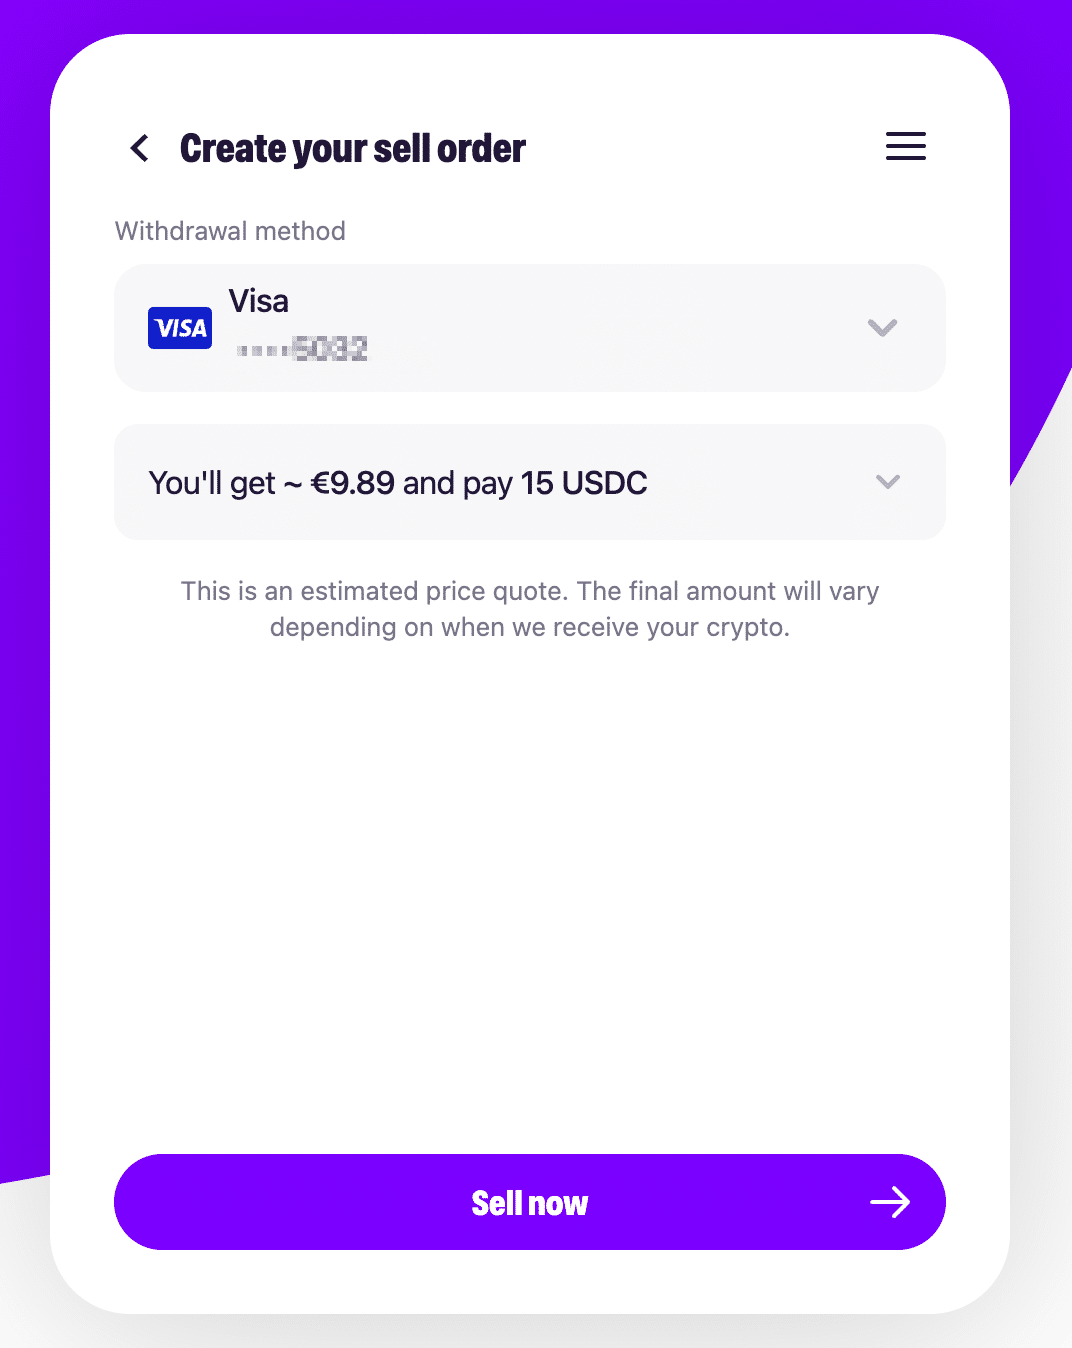
You will see an overview of your order. Verify all the details again and tap “Sell now” to complete your transaction.
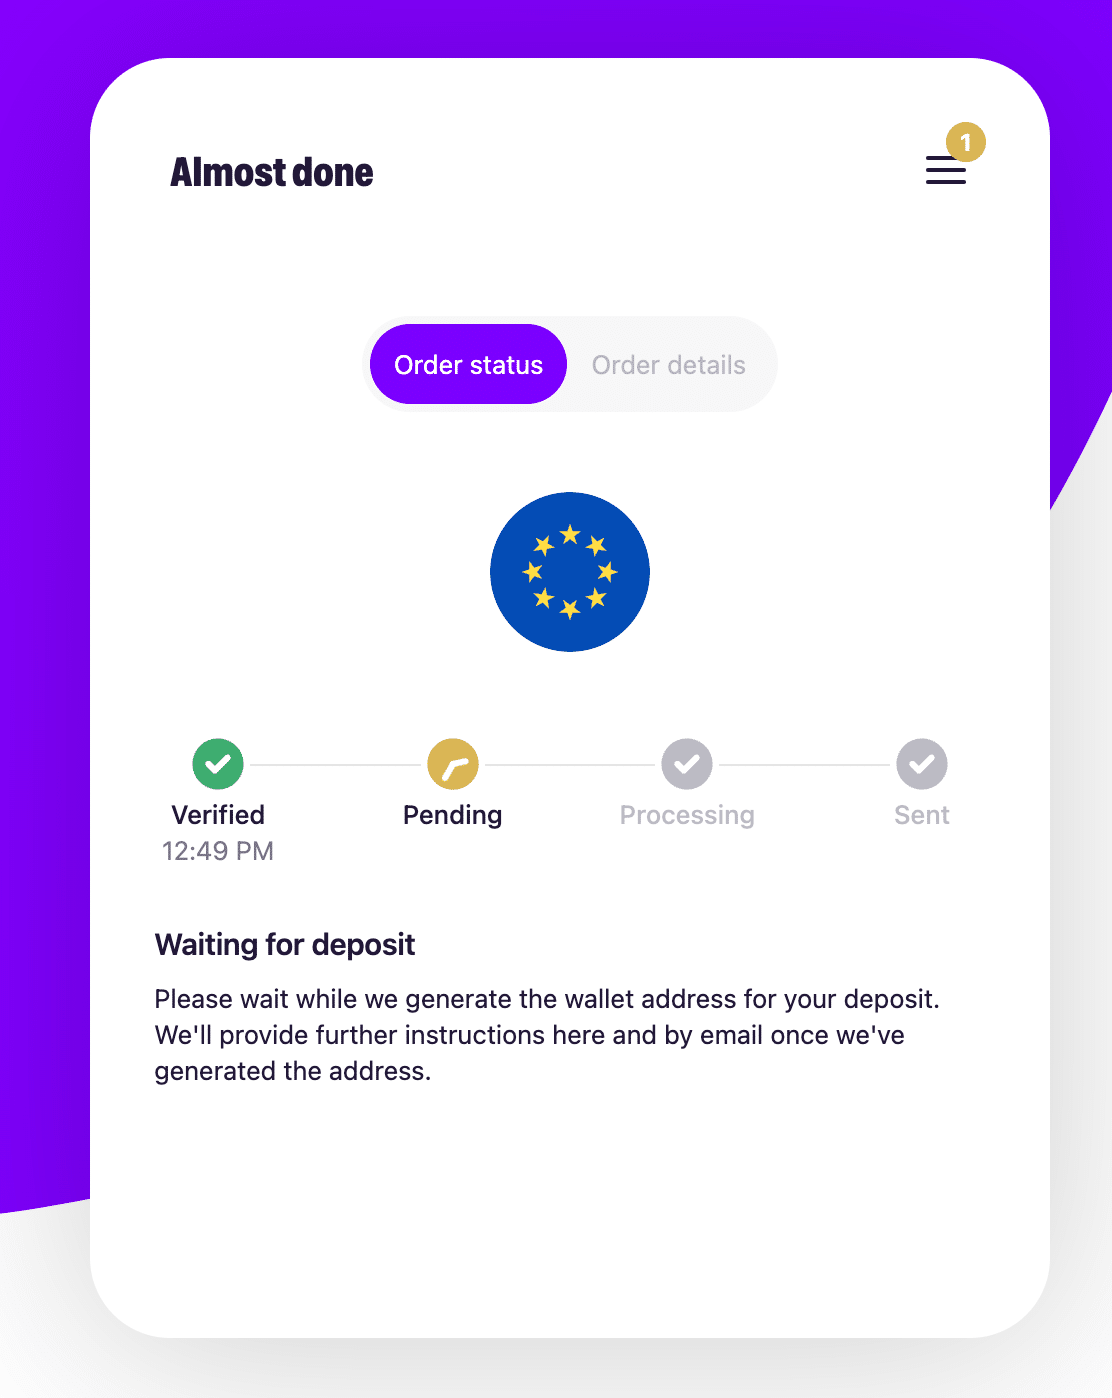
Next, you will see the current status of your transaction. Please wait a moment for the payment provider to process your request — once that’s done, they will give you the deposit address where you should send the crypto you’re selling.
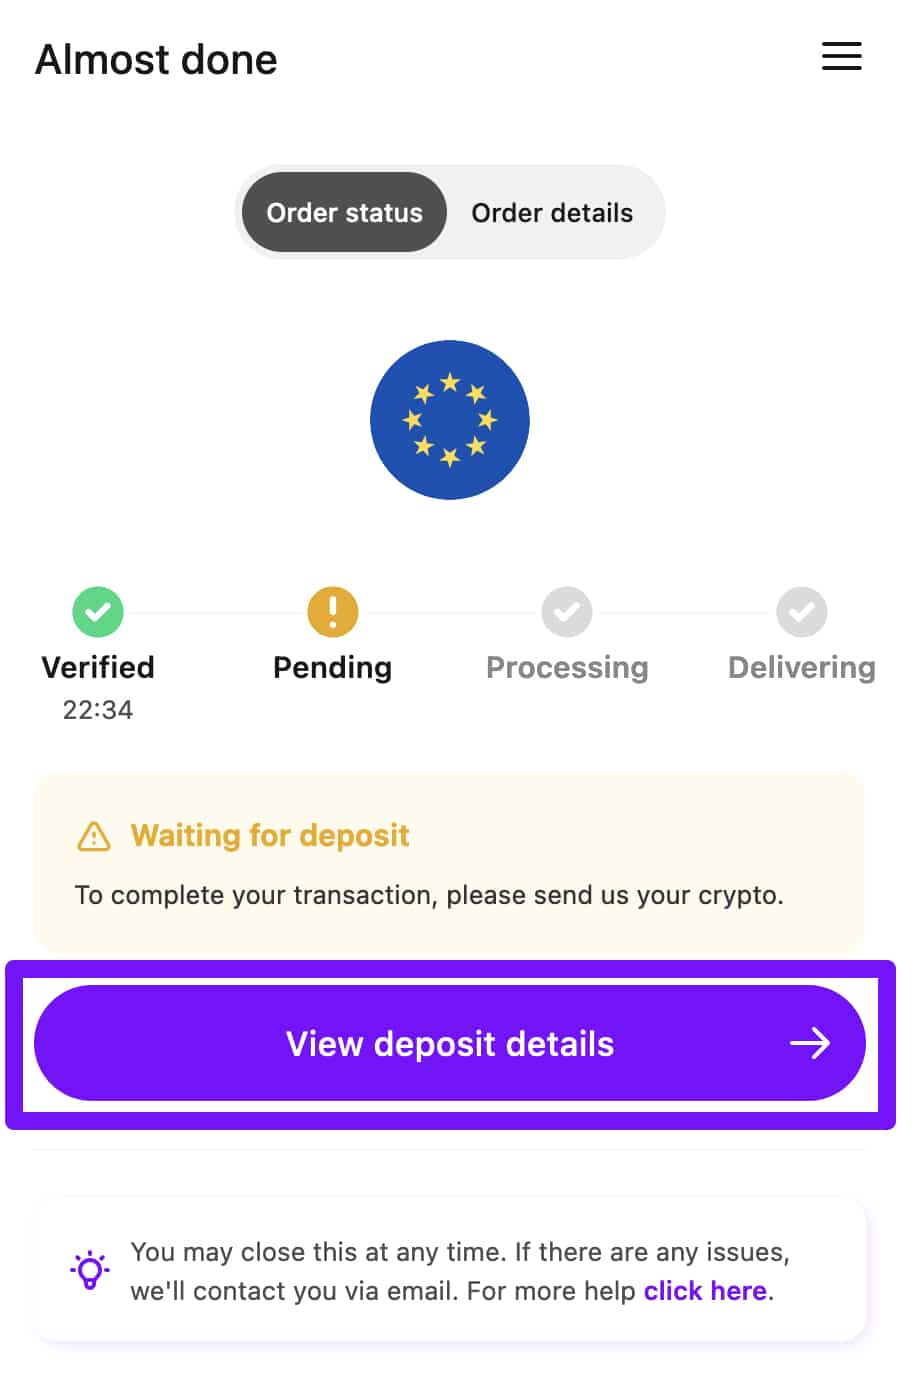
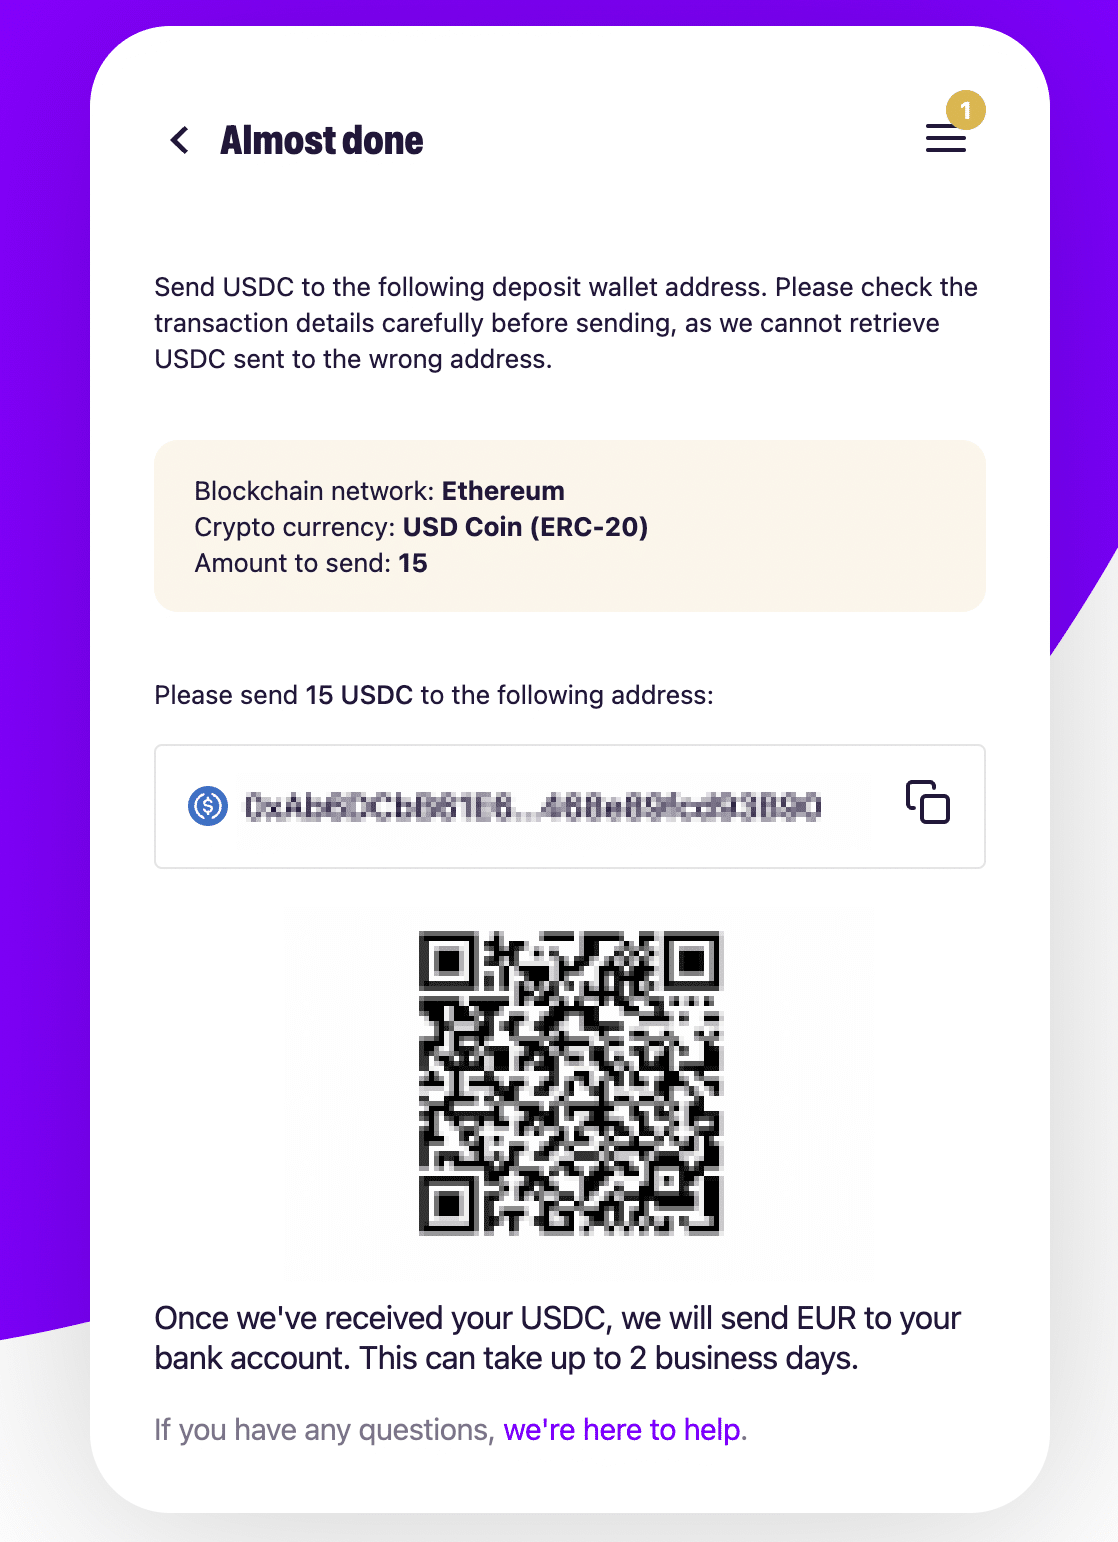
Send the crypto from your external crypto wallet to MoonPay as soon as possible to make sure the address they gave you does not expire. You can copy the crypto wallet address or use the provided QR code.
Please remember to double-check the amount, the cryptocurrency, and the network you’re sending your funds on. Blockchain transactions are irreversible, so it is very important to ensure your information is accurate. If you’re uncertain how to complete the transfer, please reach out to our support team for help.
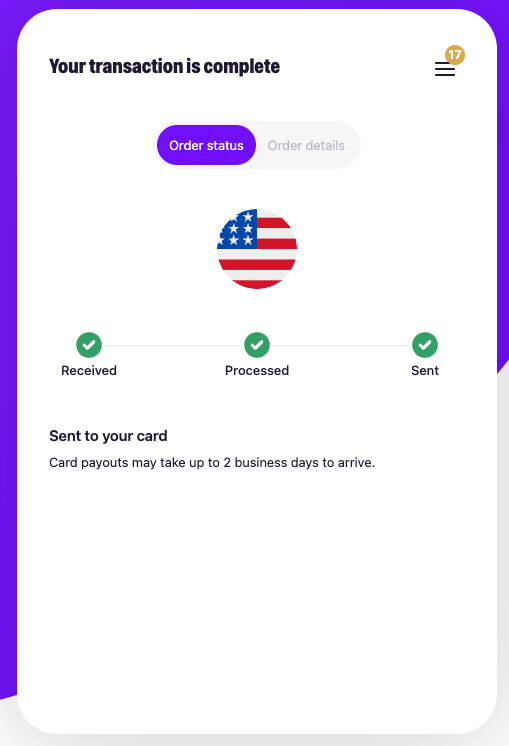
Once your transfer goes through, a confirmation email will be sent to you. A sell order on MoonPay usually takes somewhere between 30 minutes and 2 business days to arrive. Processing times can vary depending on your chosen payment method — you can learn more about this here. You can track your transaction status on this screen.
The verification process on MoonPay usually takes somewhere between 5 and 30 minutes.
This feature is available in most countries across the world, including the US, UK, and EU. To view the list of non-supported countries, please visit this page.
MoonPay won’t be able to help you if you send cryptocurrency to the wrong address. Please double-check all the information you enter.
Disclaimer: Please note that the contents of this article are not financial or investing advice. The information provided in this article is the author’s opinion only and should not be considered as offering trading or investing recommendations. We do not make any warranties about the completeness, reliability and accuracy of this information. The cryptocurrency market suffers from high volatility and occasional arbitrary movements. Any investor, trader, or regular crypto users should research multiple viewpoints and be familiar with all local regulations before committing to an investment.
The post How to Sell Crypto in Changelly App via MoonPay — A Step-by-Step Guide appeared first on Cryptocurrency News & Trading Tips – Crypto Blog by Changelly.
Full story here:
Step 1. Initiate the Transaction
Selling crypto in the Changelly app is as easy as buying or swapping it. To begin, tap the middle button at the bottom of the screen and select the Sell option.


You will be redirected to the MoonPay widget, where you can select the cryptocurrency you want to sell and the fiat currency you want to get and enter the amount. Tap Continue to proceed to checkout.

Step 2. Proceed to Checkout
To sell crypto via MoonPay, you will need to verify your identity. The first step to doing that is entering your email address.

You will receive an email with a verification code. If you can’t find it in your inbox, check your spam folder.

After you enter the code, check the box below to agree to MoonPay’s Terms of Use. Check the second box if you’d like to receive promotional emails and news from MoonPay and their partners.

Next, you’ll need to enter your basic personal information. Please enter the correct information into the designated fields — if there are any mistakes, you won’t be able to pass the verification process. Then, tap Continue to proceed.

Fill in your billing address, which should match the residential address you provided to your bank. Make sure to double-check all the information you’ve entered. Once you’ve done that, tap the Continue button to go to the next step.
Step 3. Verify Your Identity
During the identity verification process, you will need to submit an ID document and undergo a liveness check. Before you proceed, you can learn more about KYC and verification procedures in crypto here.

The verification process on MoonPay only takes around 5 to 30 minutes.

Please select the first option if you’re a resident or domiciled in the United States. Otherwise, choose the second one.

Now, you will need to get your ID ready. First up, choose the country your ID was issued in from the drop-down menu. Next, select the type of ID you would like to use.
Please keep in mind that the list of accepted documents differs by country. You can learn more about MoonPay’s verification process and the types of accepted IDs on this page on the MoonPay website.


At this stage, MoonPay requires that you take a photo of the front and back side of your ID. Please keep in mind that the photos you take should follow these guidelines:
- The photos must be in color; no black and white or any other filters are allowed.
- Only original photos are accepted. Edited images or screenshots are not allowed.
- Photos must be high-definition.
- The document must be easily readable, with no flash or blurriness.
- The document should be physically undamaged.
- Documents containing Latin characters are accepted; documents containing non-Latin characters without English translation will not be processed.
- Ensure all four corners of your ID are clearly visible.
- Your chosen ID should bear your signature.
- The document should be valid for at least one more month from the moment you took the photo.
Before proceeding, make sure you’ve uploaded the photos into their designated slots: the photo of the front side of your ID goes first, and the photo of the back goes second.
Now, the time has come for a liveness check, which will serve as biometric verification and confirm your status as a real person. In order to complete it, you should give the browser you’re using camera access. Follow the onscreen instructions to complete the liveness check.
Step 4. Enter Your Withdrawal Method Details
Next, you will need to provide your withdrawal method details. Your withdrawal options will depend on your country of residence.

Select your preferred withdrawal method from the options available. You will be automatically redirected to the next stage, where you’ll need to enter the specific details of the method you chose. In this example, we are using the bank card option. Ensure your information is correct, and double-check everything. Your saved billing address will be displayed below. If there are any mistakes or you want to enter a different address, tap the Update button.

If all the information is correct, tap Continue.
Step 5. Finish Your Transaction
You will see an overview of your order. Verify all the details again and tap “Sell now” to complete your transaction.

Next, you will see the current status of your transaction. Please wait a moment for the payment provider to process your request — once that’s done, they will give you the deposit address where you should send the crypto you’re selling.


Send the crypto from your external crypto wallet to MoonPay as soon as possible to make sure the address they gave you does not expire. You can copy the crypto wallet address or use the provided QR code.
Please remember to double-check the amount, the cryptocurrency, and the network you’re sending your funds on. Blockchain transactions are irreversible, so it is very important to ensure your information is accurate. If you’re uncertain how to complete the transfer, please reach out to our support team for help.

Once your transfer goes through, a confirmation email will be sent to you. A sell order on MoonPay usually takes somewhere between 30 minutes and 2 business days to arrive. Processing times can vary depending on your chosen payment method — you can learn more about this here. You can track your transaction status on this screen.

FAQ: Selling Crypto in Changelly App via MoonPay
How long does the verification process take?
The verification process on MoonPay usually takes somewhere between 5 and 30 minutes.
What counties is the MoonPay sell service available in?
This feature is available in most countries across the world, including the US, UK, and EU. To view the list of non-supported countries, please visit this page.
What if I send crypto to the wrong address / use the wrong network / send the wrong amount?
MoonPay won’t be able to help you if you send cryptocurrency to the wrong address. Please double-check all the information you enter.
Disclaimer: Please note that the contents of this article are not financial or investing advice. The information provided in this article is the author’s opinion only and should not be considered as offering trading or investing recommendations. We do not make any warranties about the completeness, reliability and accuracy of this information. The cryptocurrency market suffers from high volatility and occasional arbitrary movements. Any investor, trader, or regular crypto users should research multiple viewpoints and be familiar with all local regulations before committing to an investment.
The post How to Sell Crypto in Changelly App via MoonPay — A Step-by-Step Guide appeared first on Cryptocurrency News & Trading Tips – Crypto Blog by Changelly.
Full story here:


